
Progression
Palworld Hack Terminals, Schematics & Expeditions Guide (1.0)
Clear every Hack Terminal, bank schematics for the Drafting Table, tune QoL settings, and push Expedition power past 100% for denser rewards.
This is the systems chapter players skip while chasing towers. Hack Terminals, schematic combining, and Expedition overfarming quietly decide whether your mid-game gear and material income feel smooth or stuck.
Pair it with the base space guide when your yard is the bottleneck. If you still lack a second ore base or Capture Power ranks, finish those first so spheres and metal keep up with the gear you unlock here.
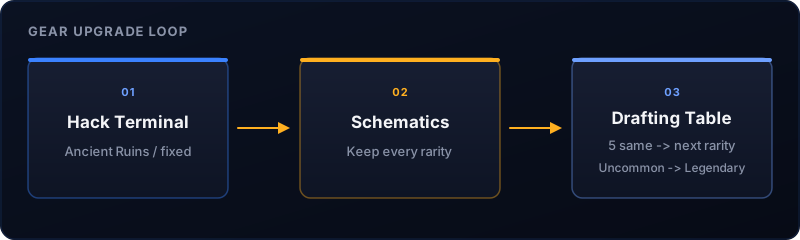
Clear every Hack Terminal you see
Hack Terminals (the puzzle devices inside Ancient Ruins and related fixed sites) are not random world clutter. Their locations stay put, and the rewards include some of the best accessory schematics in the early and mid game. If a glowing ruin is on your path, stop and finish the minigame before you fly past.
- Mark the ruin on your map the first time you spot it.
- Solve the terminal puzzle (path / power / panel variants all count).
- Loot the schematic and leave it in storage — do not sell junk Uncommons.
- Reuse Watchtowers on the same loop so fog clears while you collect ruins.
Bank schematics for the Drafting Table
Schematics are long-term currency. You craft the item while holding the schematic, and you later spend duplicates at the Drafting Table. Five copies of the same schematic at one rarity become one copy of the next rarity. Mixing different items or skipping a tier does not work.
Drafting Table combine path
| Input | Output |
|---|---|
| 5× Uncommon (same item) | 1× Rare |
| 5× Rare | 1× Epic |
| 5× Epic | 1× Legendary |
- Sort storage by schematic name so duplicates stack visibly.
- Prioritize accessories and weapons you actually wear into towers.
- Unlock the Drafting Table when the tech tree allows, then burn the backlog in one session.
Spend five minutes in Settings and menu footers
Two toggles remove a lot of friction: single-press for hold interactions, and toggle instead of hold for build-mode switching. Also disable pal aura VFX if fights become a glow soup — readability matters more than spectacle when you are timing sphere throws.
- Inventory — look for bulk stow / deposit keybinds that dump into base chests
- Map — cycle between bases without closing the UI
- Build menu — favor boxes and cushions if you use stacking scaffolds
Run Expeditions past the 100% mark
The Expedition Station is not a checkbox you abandon after one clear. Missions list a recommended combat power; that number is the floor. Overshoot it with condensed, on-element teams and both duration and reward density improve. Stopping at good enough leaves free mats on the table every cycle.
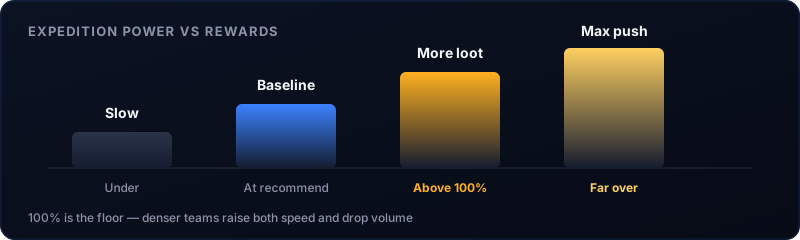
- Unlock and build the Expedition Station, then clear a Tower to open missions.
- Match the required element with part of the squad.
- Fill the rest with your highest combat power pals; condense key members.
- Launch, collect, and immediately requeue the mission you still need mats from.
One session plan
- Flip QoL settings and learn inventory stow + map base cycle.
- Sweep two biomes: Watchtower → nearby Hack Terminals → mark unfinished ruins.
- Deposit every schematic; note which Uncommons already have three or more copies.
- Queue an Expedition with power well above the recommendation while you craft.
- When Drafting Table unlocks, combine toward the accessories you wear daily.
Pitfalls
- Flying past Hack Terminals because you will come back later
- Selling Uncommon schematics for pocket gold
- Leaving hold-to-craft enabled into late game
- Canceling expeditions once the UI shows 100% power
- Building Expedition Station but never clearing a Tower to unlock missions
What to do next
- Rebuild base floor space so the Expedition Station and Breeding Farm sit on the border.
- Return to the progression route if towers still wipe your timer.
- When catches and ore are stable, spend cake on the combat pals that staff expeditions.
Guide FAQ
Are Hack Terminals the same as Watchtowers?
No. Watchtowers clear fog and unlock travel. Hack Terminals sit in Ancient Ruins (and similar fixed puzzle sites) and drop accessory and gear schematics. Do both on the same route when you can.
Should I sell common schematics?
No. Keep lower-rarity copies. At the Drafting Table you combine five identical schematics of the same rarity into one of the next rarity (Uncommon → Rare → Epic → Legendary).
Do expeditions stop being useful at 100% power?
No. Meeting the recommendation is the floor. Sending stronger condensed teams shortens timers and raises reward multipliers well past the baseline — keep running them.
Which settings are worth changing first?
Turn on single-press / toggle options so you stop holding craft and build buttons. Disable noisy pal aura VFX if combat readability suffers. Then skim every menu footer for bulk-stow and map-base keybinds.
When do expeditions unlock?
Build the Expedition Station once the tech unlocks, then clear at least one Tower boss to open early missions. More towers unlock more routes.